Assets in Projects
Assets determine billing for the project, and can be tracked through Asset Statuses
They can be assigned on a cross-business basis, to include local sub-hires.
PROJECTS:PROJECT_ASSETS:CREATE:ASSIGN_AND_UNASSIGN
PROJECTS:PROJECT_ASSETS:CREATE:ASSIGN_ALL_BUSINESS_ASSETS
PROJECTS:PROJECT_ASSETS:EDIT:ASSIGNMNET_COMMENT
PROJECTS:PROJECT_ASSETS:EDIT:CUSTOM_PRICE
PROJECTS:PROJECT_ASSETS:EDIT:DISCOUNT
PROJECTS:PROJECT_ASSETS:EDIT:ASSIGNMENT_STATUS
Adding Assets to Projects
Assets are assigned using the Asset Search functionality.
To select the project you are assigning assets to, either use the + Add Assets button on the project toolbar, or select a project when searching assets.
You can also assign all assets to the project, using the add all button.
 Shopping buttons are highlighted: Add All Assets to Project in blue, Add assets to this project in red
Asset List
The Asset list shows all assets associated with the project, organised by Category and Asset Type.
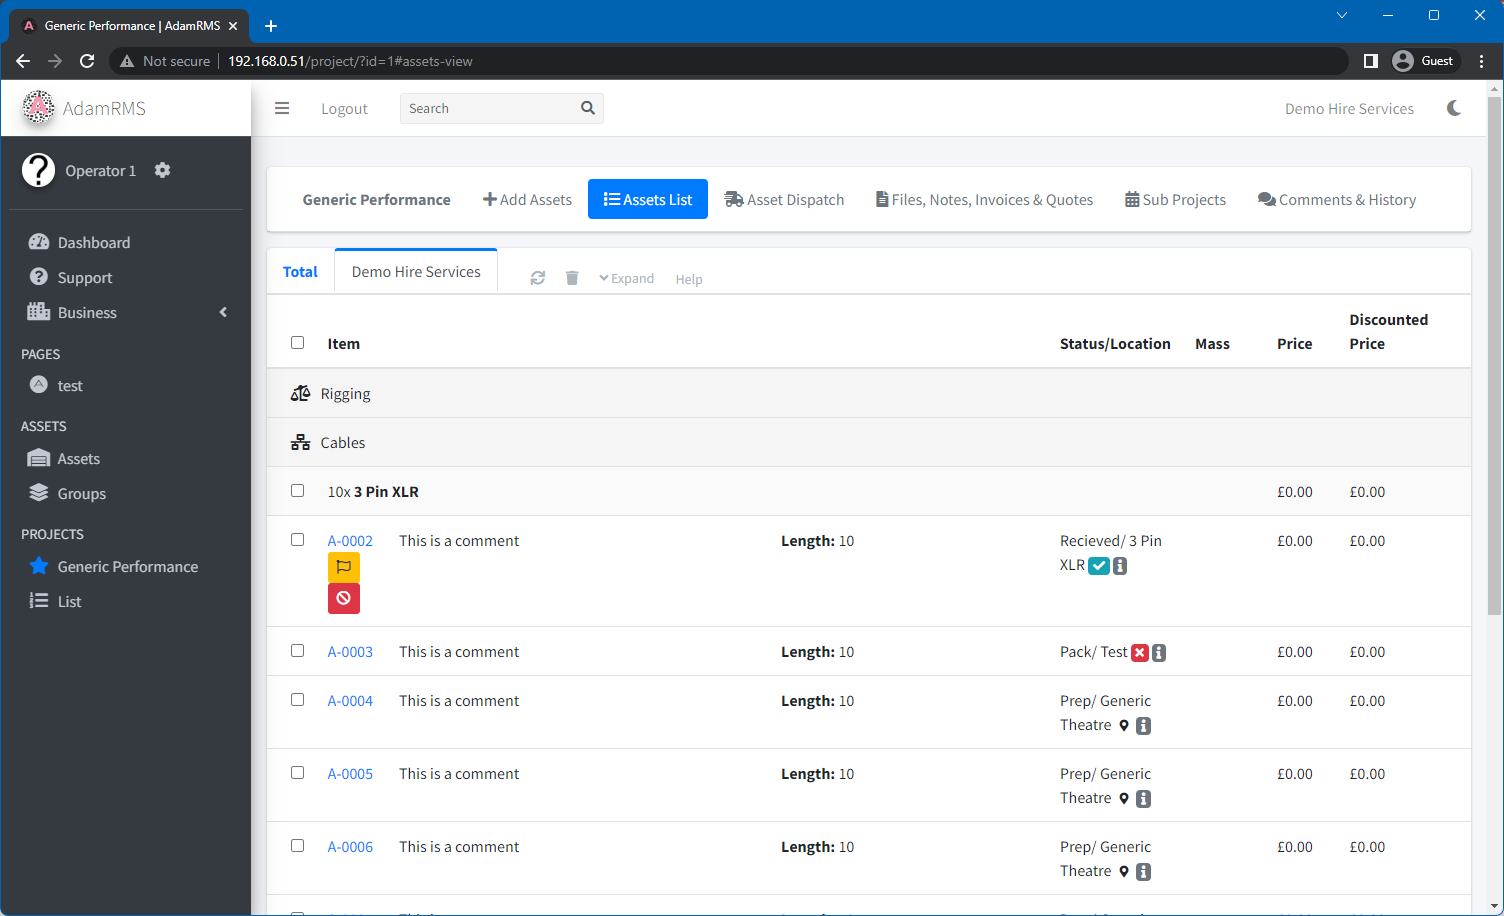 A Project's asset list
Asset List functions
There are a number of functions that can be used to alter project asset properties.
Some require additional permissions so may not be visible to you.

Assignment Comment | Discount | Custom Price | Set asset Statuses | Swap Asset | Remove Asset | Expand List
Comments
Assignment comments can be used to highlight specific things about the asset assignment.
For example, requesting a particular DMX address or gel colour.
Discount & Custom Price
By default, AdamRMS calculates hire costs based:
- The weekly & daily prices set in the asset, or in the asset type.
- The hire period, which by default is based on the number of days in the project. You can alter how this is calculated in the project settings, by setting project duration for asset pricing purposes to be based on the number of days in the project, or a custom number of days & weeks set by you. This is useful for long term hires, where you may want to charge a weekly rate for each week, rather than a daily rate for each day, or to tailor pricing further.
You can override the hire price in two ways:
- Discounts
- Set price based on a percentage of the asset's cost
- Custom Price
- Set price using any value
- Setting the project duration for asset pricing purposes to 0 weeks 0 days, which will set the price of all assets to 0 for that project.
Set Status for assets
This function allows you to set the asset status for selected assets or all assets (if no assets are selected) associated with the project.
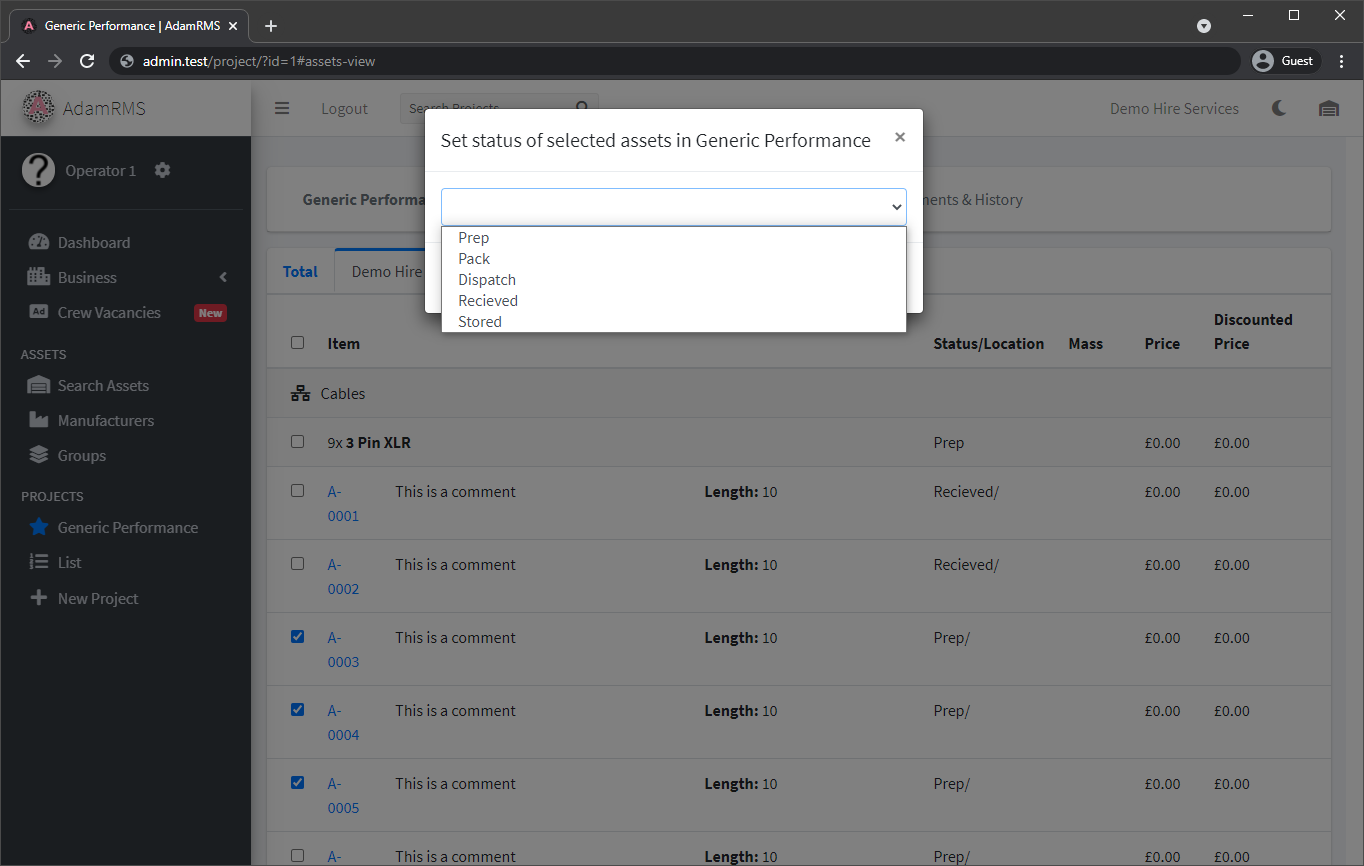
Setting asset status
Swap Assets
If you have multiple assets of the same type, you may want to swap assets to the ones picked rather than finding the exact asset listed by the Project Manager.
This function lists available assets to the project, and you can select a new asset based on the asset Tag.
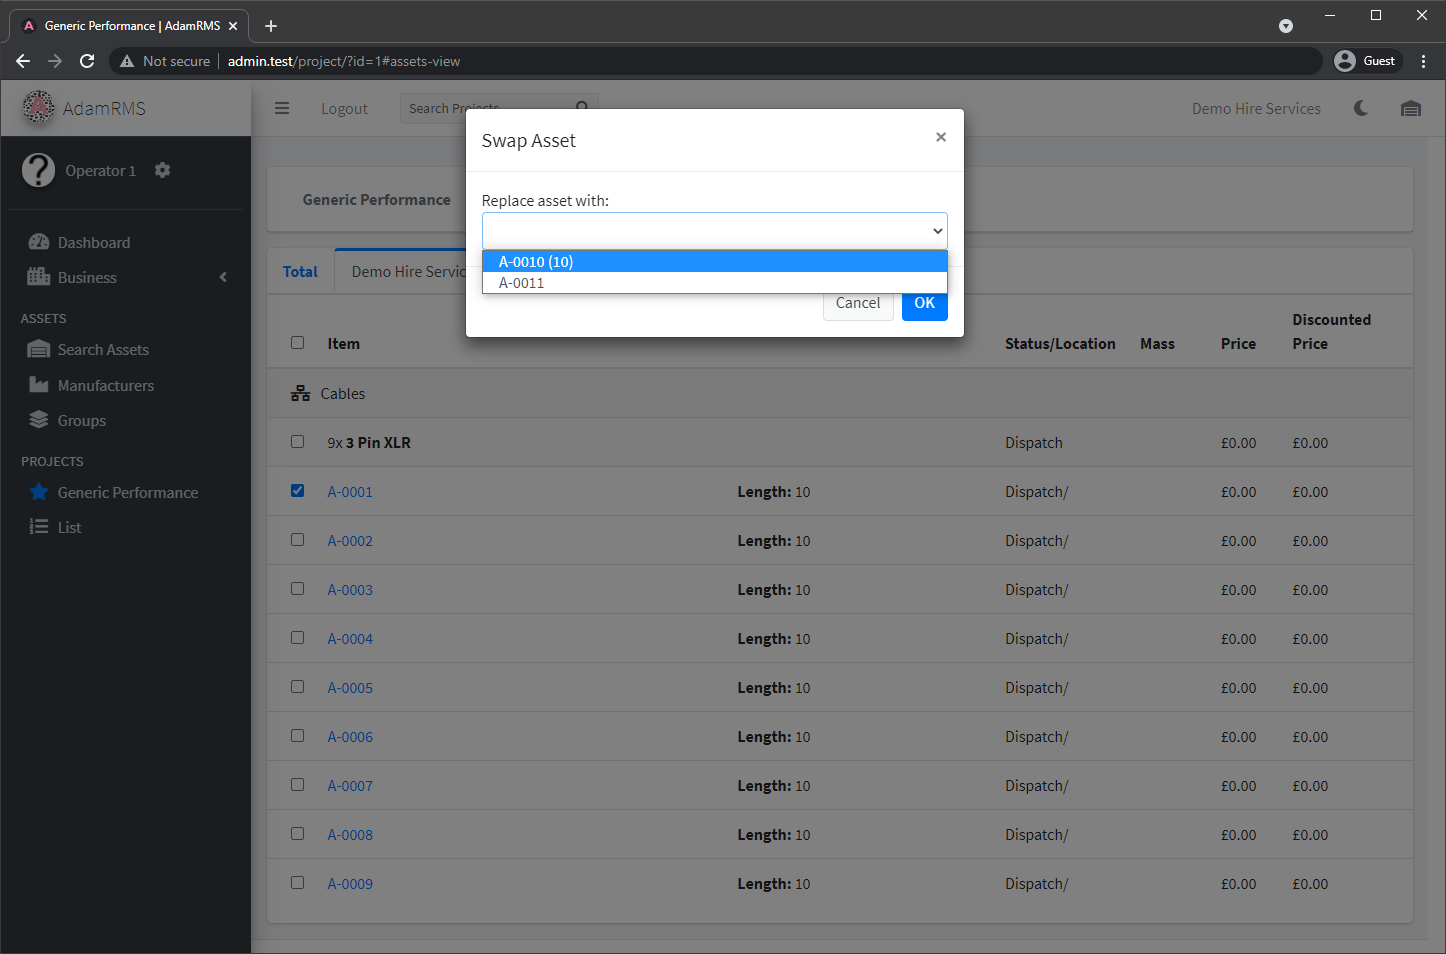 Swapping assets. The value in brackets is the first custom field of the asset type.
Remove Asset
Remove an asset from the project.
Asset Dispatch
Asset dispatch is a board layout view of all assets assigned to your project.
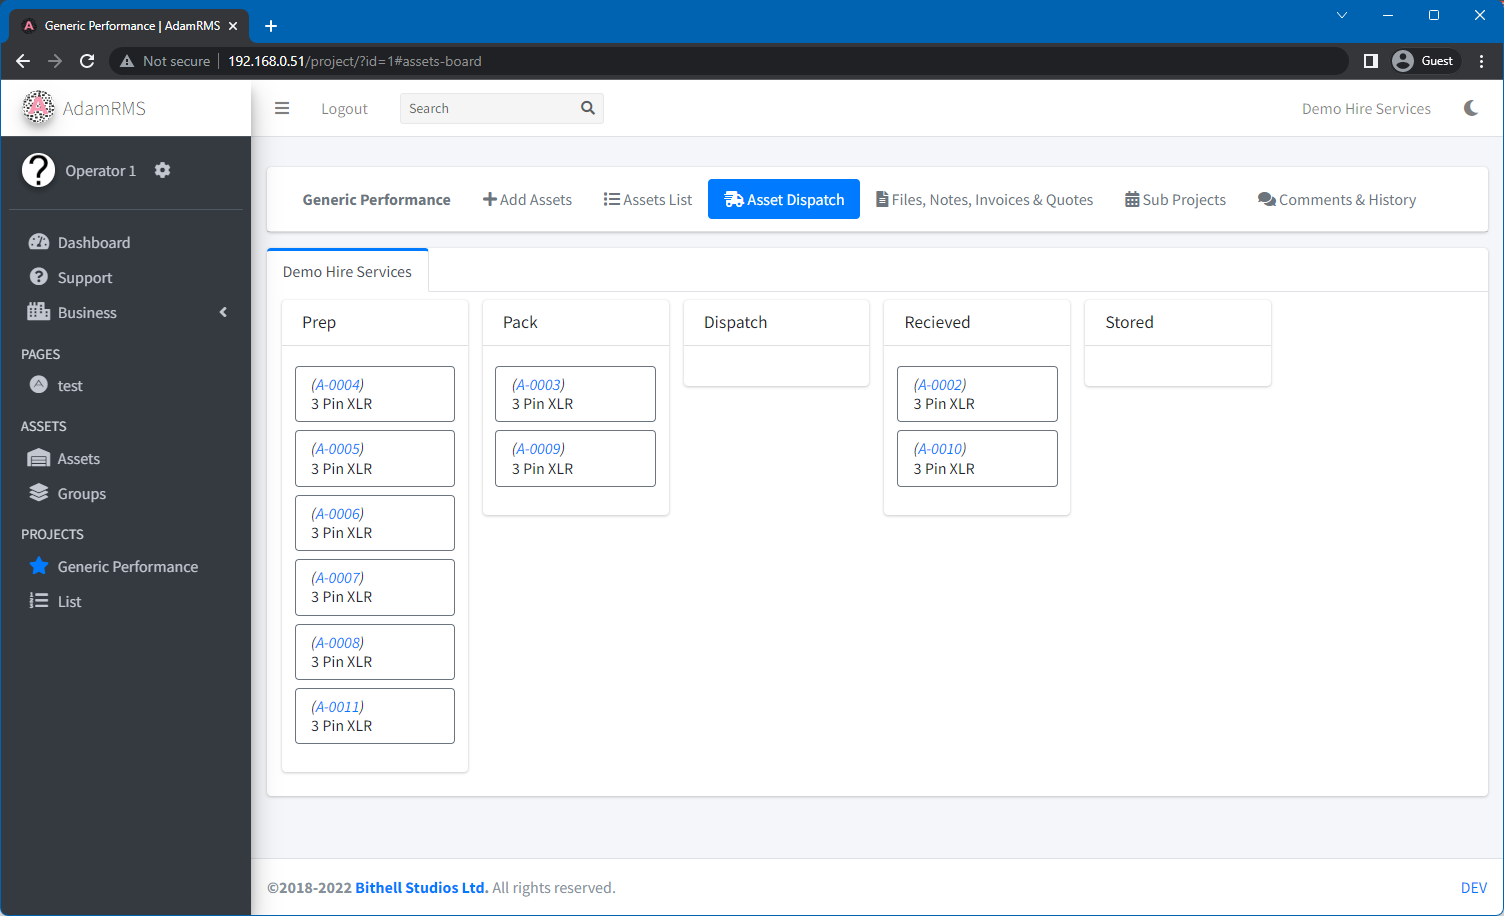 Asset Dispatch
You can update an asset's status by moving it between status columns, using the arrow buttons or by dragging and dropping the asset.
Quick Dispatch
The Quick Dispatch button in the board header opens a dialog where you can enter an asset's tag to quickly set its status, without needing to find and drag the asset on the board. This is useful for quickly processing large numbers of assets.
Barcode Dispatch
The Barcode Dispatch button in the board header opens a dialog that allows you to scan asset barcodes to update their dispatch status. This supports:
- Camera scanning - use your device's camera to scan barcodes directly
- USB/Bluetooth scanners - use a connected barcode scanner or type a barcode value manually
Select the target status from the dropdown, then scan or enter barcodes. Each scanned asset will be moved to the selected status on the dispatch board automatically.
Supermarket Sweep
If you scan a barcode for an asset that is not currently assigned to the project, AdamRMS will prompt you to add it. Confirming will assign the asset to the project and set its status in one step. This is useful when picking assets from a warehouse — you can scan items as you go without needing to pre-assign them to the project.
This feature requires the PROJECTS:PROJECT_ASSETS:CREATE:ASSIGN_AND_UNASSIGN permission in addition to the dispatch status permission. If you do not have this permission, you will see the standard error message instead.
For more information about barcode scanning methods, see Asset Barcodes.